Continuous Integration with a Custom NuGet server
In any software development shop with a bit of common sense, sooner or later someone will raise the question on how to deploy and manage all the common libraries and modules which do not belong to a specific project but are used across the board.
A few solutions exists, but one which I particularly like and that I want to show you here is to walk the awesomeness path and put up your own NuGet package server.
It may seem a bit extreme but the benefits are incredible and will be clearer at the end of this post… Beside that, this is something that Java developers and Ruby developers have been doing for ages (and better!), the former using Maven and the latter using gems, so it’s about time you as a .Net developer join the grown-ups!
Setting up a server is a matter of a few mouse clicks as brilliantly explained in this tutorial on the NuGet site.
While going through the tutorial, take special attention to the important settings in the web.config. The apikey is the value you will need to remember if you want to be able to publish your packages:
<appSettings>
    <!-- Determines if an Api Key is required to push\delete packages from the server. -->
    <add key="requireApiKey" value="true" />
    <!--
        Set the value here to allow people to push/delete packages from the server.
        NOTE: This is a shared key (password) for all users.
    -->
    <add key="apiKey" value="password" />
    <!--
        Change the path to the packages folder. Default is ~/Packages.
        This can be a virtual or physical path.
    -->
    <add key="packagesPath" value="C:\NuGet\Packages" />
</appSettings>
Using your new server
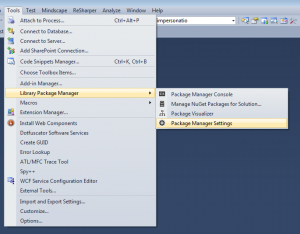
Deploy the server you created above anywhere you like, using IIS or IIS Express. I deployed it to a Virtual Machine where I keep my CI server as well (Jenkins in my case). When everything is up and running, you can set up Visual Studio to pick up packages from it. Just go in Visual Studio, Tools -> Library Package Manager -> Package Manager Settings:
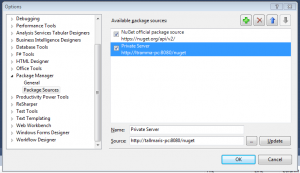
In the window that opens select “Package Sources” and click the big + up there. Give it a sensible name and set the url correctly. If you followed the tutorial above, the URL should be the server name, port 8080, followed by /nuget. In my case it was http://tallmaris-pc:8080/nuget:
Upload your package
The server naturally comes with a very limited selection of packages, ready to accept and serve your packages. Creating and publishing your package is a pretty straightforward process which can be done either through the command-line or a nice GUI.
In the example I will use the command line, but have a look at the GUI yourself because it makes things even easier (just point and click).
So, let’s suppose I have a Crypto Provider library full of marvellous methods for encrypting, decrypting, hashing and salting; and I want to publish it to my server so my colleagues can use it and bask in its light. After installing NuGet.exe and opening up the command line, I move to the folder where my DLL resides and type:
nuget spec TestCrypto.dll
This creates a bare XML file called TestCrypto.nuspec with some basic metadata, which I then edit to my heart content:
<package >
    <metadata>
        <id>Test.CryptoProvider</id>
        <version>0.1.0.0</version>
        <title />
        <authors>Leandro Tramma</authors>
        <owners />
        <requireLicenseAcceptance>false</requireLicenseAcceptance>
        <description>A test description</description>
        <summary>A test summary</summary>
        <releaseNotes>Just testing</releaseNotes>
        <copyright>Me and only me</copyright>
        <language>en-GB</language>
        <tags>Test Crypto</tags>
    </metadata>
    <files>
        <file src="lib\TestCrypto.dll" target="lib\net35\TestCrypto.dll" />
    </files>
</package>
The lib folder and to extract them into the relevant .net framework version folder. Before proceeding to the next step I created a folder called lib sitting next to the .nuspec file, and placed my dll file there.
It’s now time to package our work, again with a nuget command:
nuget pack TestCrypto.nuspec
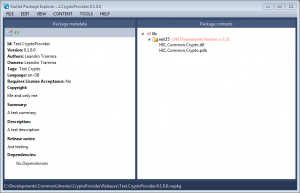
This will create a file called Test.CryptoProvider.0.1.0.0.nupkg. You can see that the name comes from the id and the version number in our metadata file. You can open this file with the NuGet package explorer and see that it contains the metadata and the files we specified (DLL names were different on my machine but you get the idea):
Last step, let’s publish our package:
nuget push Test.CryptoProvider.0.1.0.0.nupkg -s http://tallmaris-pc:8080/ password
As you can see we are pushing to our private nuget server, hosted on tallmaris-PC in my case, using the apikey defined above in the web.config… You may want to set it to something a bit better than password of course!
Get the package
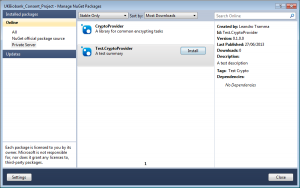
Adding the dependency into our project is now a simple matter of opening up the NuGet package manager in Visual Studio and clicking Install:
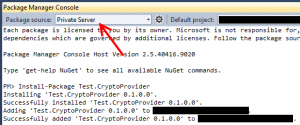
Of course you can also do everything from the PM console in Visual Studio, just remember to select the correct source from the dropdown (or just select “All”):
You should see the familiar “packages” folder showing up in your solution folder with all the files we specified.
At this point the benefits should be evident; your common libraries now live in a central repository and you can specify dependencies on them, you can update your common DLLs and through NuGet update the package in your solution without going crazy with svn externals or other workarounds. Moreover, with NuGet you can request a specific version of a package and skip the updates if they have some breaking changes for your project.
Is that all?
If you want, you can stop here and you will live happily with your NuGet custom server, as long as you remember to put the “packages” folder in SVN for everyone to get and so that your CI server can still build. The next step I would like to cover here is to decouple and remove this burden of having all our packages following us into our SCM system (SVN, Git, whatever), which can be quite annoying if it’s many MB of data.
NuGet and Visual Studio cope very nice with this scenario with a feature called Package Restore, which enables VS to download missing packages when building our solution.
The feature needs to be enabled in two places: the first step is again in the Package Manager Settings, this time the “General” settings. You will see a checkbox which clearly states its purpose; tick it and leave it like that. The second part is done on a per solution basis, meaning that will need to be enabled for every solution. In VS right click on the solution (or project) and select “Enable NuGet Package Restore”.
This will create a folder called .nuget and a few files in there. You will recognize the NuGet executable (useful in case it is not installed on the machine) and a targets file: this will add some ms build targets to the project which will be run before the build itself. You have of course to add this .nuget folder into your SCM system.
What about my CI server?
With the above setup, everything should work nicely on your machine, but chances are you will have problems when building in your CI server. The main reason behind this is that while your machine (and Visual Studio) know about the private NuGet server, the CI machine doesn’t, so we will need to point it in the right direction. This direction is written in a file located in the %AppData%/NuGet folder, called NuGet.config. Note that if the CI service is running as a different user, you will have to modify the NuGet.Config file in that user AppData folder; if it’s running as Local System, the folder is most probably C:\Windows\System32\config\systemprofile\AppData\Roaming\NuGet.
Unfortunately you cannot manage this file with the GUI so your options are to either edit this file manually or use the command line tool to manage sources (which I tend to prefer, but it will only change the config of the logged in user). On the CI machine, install the NuGet.exe command line tool and type:
nuget sources Add -Name LocalServer -Source http://tallmaris-pc:8080/nuget
Of course you can choose any name you like. Type nuget sources List to confirm that your entry is added to the sources:
That should be everything you need, now you can just code, install your nuget packages and conveniently “forget” about adding them to SVN, the build process will take care of everything.
Happy coding!
Build and deploy .NET projects with Rake and Albacore Entity Framework part 2: Migrations and Relationships
